Having your own lab, whether at work or at home, is the promise of progress: being able to break things and start again, train, develop, and test attacks and tools.
However, setting up a lab can be long and tedious. It can take several months to reach a satisfactory result-and it will still be hard to reproduce. Ludus solves this problem: this Ansible-based tool makes it relatively easy to deploy complex labs on hypervisors.
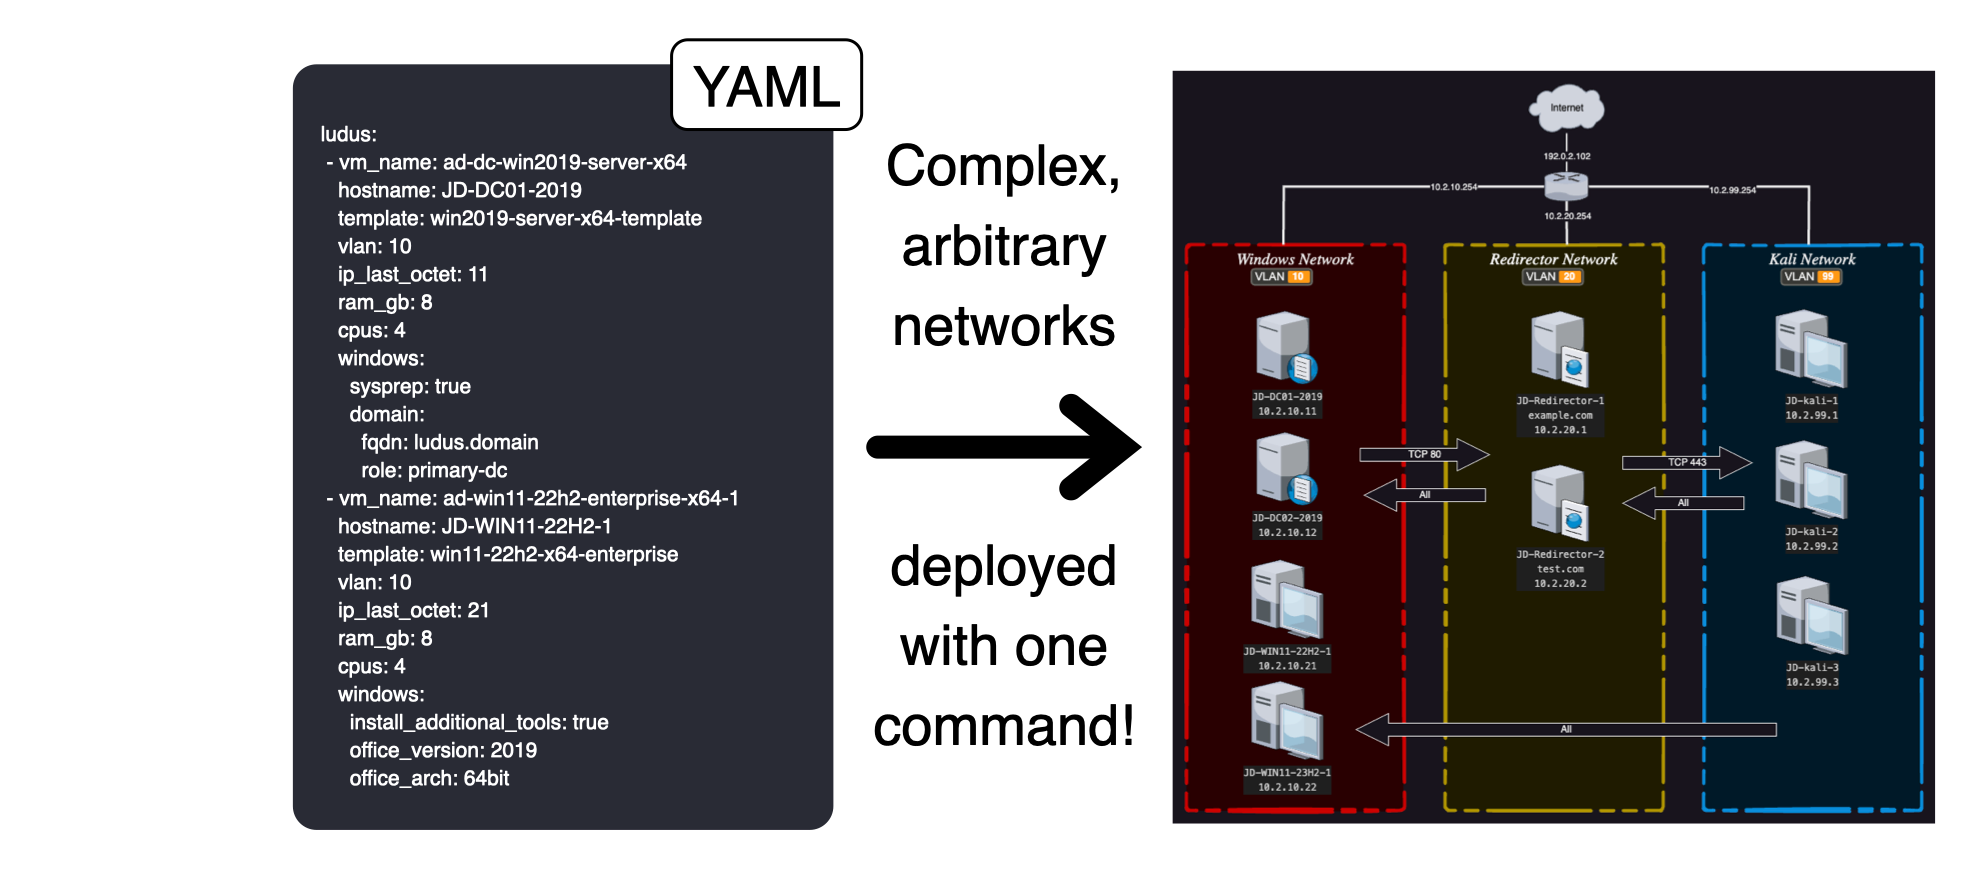
Above is Ludus’ promise: turning a “simple” configuration file into a running, usable lab.
In this article, I’ll explain the basics of how Ludus works and show you how to deploy your own lab on Proxmox.
By the end, we’ll have understood how Ludus works and deployed our first range like this:
Prerequisites
Hardware
Hardware-wise, I’m using a dedicated tower hosted at a friend’s place:
- AMD Ryzen 7 3700X 8-Core Processor
- NVIDIA Corporation TU104 [GeForce RTX 2070 SUPER] (to do a bit of ML)
- 94 GiB RAM
- 2 TB disk
This machine has been used for more or less messy projects over the last few years, but it’s still a faithful companion. Hopefully it will be enough for this adventure.
Note that for most labs, a smaller setup can also be sufficient. We should be able to deploy our three-VM range with 16 GB of RAM or more.
Setting up the OS
A quick reminder of the two main hypervisor families:
- Type 2 (Hosted): software installed on top of your usual OS (like VirtualBox on Windows). Convenient for testing, but you lose performance because the host OS consumes resources.
- Type 1 (Bare Metal): a full operating system installed directly on the hardware (e.g., Proxmox, ESXi). This is the “pro” option: no unnecessary layer between your VMs and the CPU.
For this project, we opted for Proxmox, a Debian-based Type 1 hypervisor. It’s reliable, open source, and has a strong community-more than enough for projects like this.
To install Proxmox, this guide is detailed: https://pve.proxmox.com/wiki/Installation
In short, it’s like installing any OS-except this time you’re installing your Type 1 hypervisor.

Example of an installed Proxmox
- For better security, I access my range through WireGuard, which connects to the internet box behind which the tower is hosted. In general, it’s not a good idea to expose the Proxmox management interface on the Internet.
Ludus (The “Game Changer”)
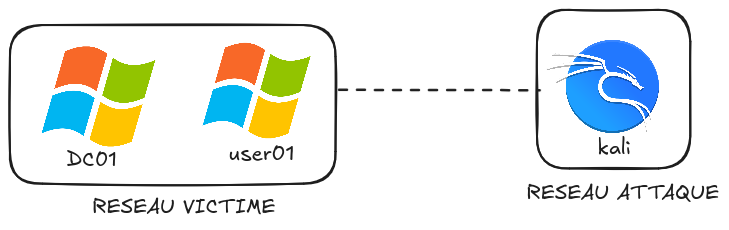
Setting up a complete Active Directory environment with clients, a domain controller, monitoring tools, and consistent networking can take days (and be a real pain). That’s where Ludus helps.
Ludus is an Infrastructure-as-Code deployment tool designed specifically for labs. Ludus will instruct Proxmox to create, configure, and link your machines together based on architectures you define ahead of time.
Highlights:
- Speed: from days of manual work to minutes (mostly image build + deployment time).
- Reproducibility: if you break everything (which happens), you can wipe the lab and rebuild it identically with a single command.
- Test-ready: easy integration with tools like Ghostwriter, the Elastic stack for monitoring, or hardened/vulnerable AD environments depending on your needs.
Ludus architecture
Here’s a schematic overview of a Ludus range:
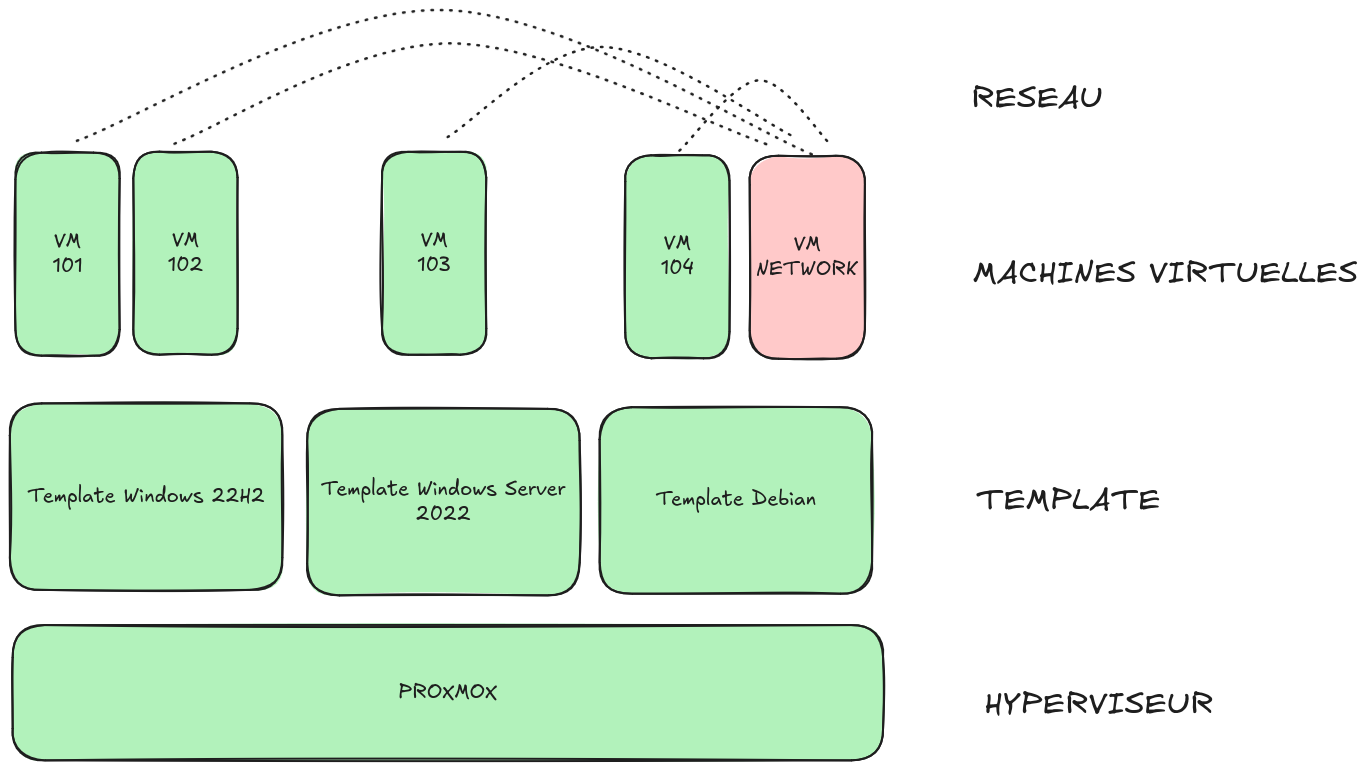
Templates are VM “bases” prebuilt by Ludus when you run ludus template build. VMs are linked clones of their original template. A linked clone means the VM disk only stores differences from the template disk, which saves a lot of space.
Networking
You can also notice the Network VM (in red). It’s responsible for connecting all VMs together. By default, there is no network segmentation. However, in the configuration you choose a VLAN per machine; machines on the same VLAN share the same virtual network interface.
Here’s a simplified view:
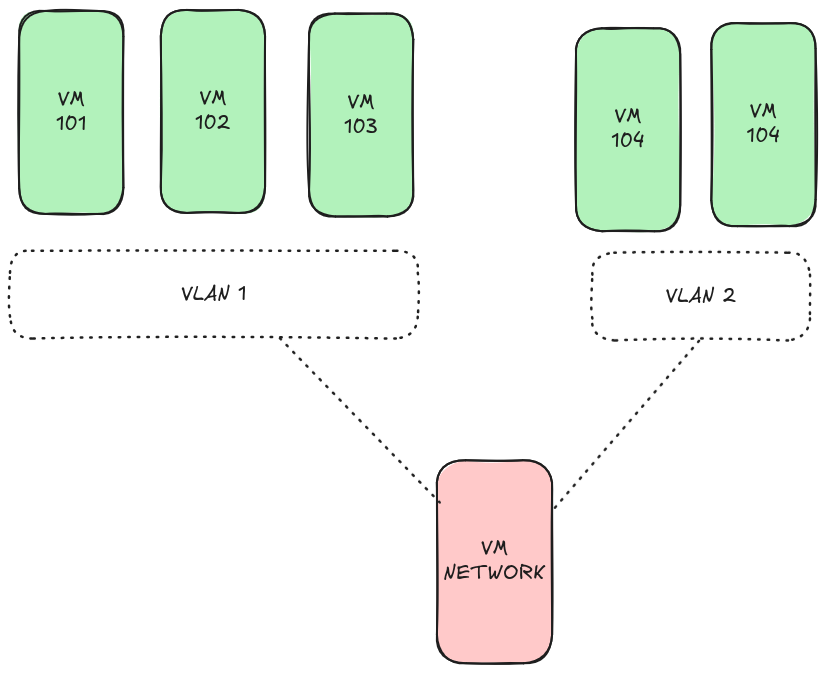
VMs on the same VLAN can communicate directly without going through the network VM (called router in Ludus). But to go from VLAN 1 to VLAN 2, traffic must go through the Network VM.
- Note: the VLAN ID is an abstraction only on the hypervisor side to segment networks that may use the same addressing. For the VMs, this is transparent.
Deploying roles
To finish the Ludus architecture overview, we need to talk about Ansible roles.
In Ansible, a role is a reproducible and parameterizable set of tasks that ensures a state. Example: a web server with Apache installed.
Using roles, Ludus runs configuration tasks:
- VM deployment
- VM startup
- network installation and configuration
Once that’s done, you can use Ludus’ predefined roles or add your own to configure your range.
Installing Ludus: simplicity first
Here’s how to install Ludus on the Proxmox node.
The magic script
Installation is a single command provided by the official docs:
curl -sS https://install.ludus.cloud | sudo bash
It installs in /opt/ludus. You can regularly run ludus-install-status to check progress.
Creating a user
To use Proxmox via Ludus, you need at least one user. If you plan to share the installation, you can add more users later.
Retrieve the API key like this:
root@pve:/opt/ludus# ludus-install-status
Ludus install completed successfully
Root API key: ROOT.YYY-XXXXXXXXX
As indicated in the docs, create your first user:
LUDUS_API_KEY='ROOT.YYY-XXXXXXXXX' \
 ludus user add --name "Mon Utilisateur" --userid MONID --admin --url https://127.0.0.1:8081
+--------+------------------+-------+---------------------------------------------+
| USERID | Proxmox USERNAME | ADMIN |                   API KEY                   |
+--------+------------------+-------+---------------------------------------------+
| JD     | mon-utilisateur  | true  | MONID._ZZZZZZ                               |
+--------+------------------+-------+---------------------------------------------+
Save the new API key returned by the command. You can also export it in your bashrc:
echo export LUDUS_API_KEY=MONID._ZZZZZZ >> ~/.bashrc
source ~/.bashrc
This new key replaces the root key, which doesn’t allow a normal user to build templates, deploy VMs, etc.
Building templates
Templates are the base images used to create VMs. List them with:
ludus template list
+------------------------------------+-------+
|              TEMPLATE              | BUILT |
+------------------------------------+-------+
| debian-11-x64-server-template      | FALSE |
| debian-12-x64-server-template      | FALSE |
| kali-x64-desktop-template          | FALSE |
| win11-22h2-x64-enterprise-template | FALSE |
| win2022-server-x64-template        | FALSE |
+------------------------------------+-------+
On the Proxmox side, each VM behaves as a linked clone of a template: identical until you customize it.
Now build them:
ludus templates build
You can now grab a coffee, watch Titanic, then grab another coffee.
Setting up a first range
Each user has their own range, named after the user ID. If you want multiple ranges, creating multiple users is the most Ludus-friendly approach.
At any time you can check status:
ludus range status
+---------+---------------+------------------+---------------+-------------------+-----------------+
| USER ID | RANGE NETWORK | LAST DEPLOYMENT  | NUMBER OF VMS | DEPLOYMENT STATUS | TESTING ENABLED |
+---------+---------------+------------------+---------------+-------------------+-----------------+
|  admin  |  10.2.0.0/16  | 2025-12-26 16:53 |       0       |     DESTROYED     |      FALSE      |
+---------+---------------+------------------+---------------+-------------------+-----------------+
+------------+---------+-------+----+
| Proxmox ID | VM NAME | POWER | IP |
+------------+---------+-------+----+
+------------+---------+-------+----+
Above, you can see I tested a new environment and then destroyed it.
Now let’s create our first environment:
cd /opt/ludus
mkdir ranges
cd ranges
vim first-range.yml
Copy/paste the following configuration:
ludus:
  - vm_name: "{{ range_id }}-ad-dc-win2019-server-x64" # VM name in Proxmox. You can use {{ range_id }} (e.g., JS)
    hostname: "{{ range_id }}-DC01-2019"               # Hostname (Windows limited to 15 chars because of NETBIOS)
    template: win2022-server-x64-template              # Base template (see `ludus templates list`)
    vlan: 10                                           # VLAN (third octet of the IP), between 2 and 255
    ip_last_octet: 11                                  # Last octet, must be unique per VLAN
    force_ip: true                                     # Force IP even if qemu-guest-agent doesn't answer
    ram_gb: 8
    cpus: 4
    windows:
      sysprep: false
      gpos:
        - disable_defender
        - anon_share_access

    domain:
      fqdn: ludus.network
      role: primary-dc
    dns_rewrites:
      - example.com
      - '*.example.com'
    unmanaged: false
    primary_dns_server: 1.1.1.1
    secondary_dns_server: 8.8.8.8

  - vm_name: "{{ range_id }}-ad-win11-22h2-enterprise-x64-1"
    hostname: "{{ range_id }}-WIN11-22H2-1"
    template: win11-22h2-x64-enterprise-template
    vlan: 10
    ip_last_octet: 21
    ram_gb: 8
    cpus: 4
    windows:
      sysprep: false
      chocolatey_ignore_checksums: false
      chocolatey_packages:
        - vscodium
      office_version: 2019
      office_arch: 64bit
      visual_studio_version: 2019
      autologon_user: myuser
      autologon_password: mypass
    domain:
      fqdn: ludus.network
      role: member

  - vm_name: "{{ range_id }}-kali"
    hostname: "{{ range_id }}-kali"
    template: kali-x64-desktop-template
    vlan: 99
    ip_last_octet: 1
    ram_gb: 8
    cpus: 4
    linux:
      packages:
        - curl
        - python3
    testing:
      snapshot: false
      block_internet: false

defaults:
  snapshot_with_RAM: true
  stale_hours: 0
  ad_domain_functional_level: Win2012R2
  ad_forest_functional_level: Win2012R2
  ad_domain_admin: domainadmin
  ad_domain_admin_password: password
  ad_domain_user: domainuser
  ad_domain_user_password: password
  ad_domain_safe_mode_password: password
  timezone: Europe/Paris
  enable_dynamic_wallpaper: true
Above we create an extremely basic range with an AD, a workstation, and a Kali VM. We also define the ludus.network domain which the workstation will join.
If you’re familiar with Ansible, you’ll notice the format is very close-Ludus is built on Ansible. Otherwise, I recommend Stéphane Robert’s great course: https://blog.stephane-robert.info/docs/infra-as-code/gestion-de-configuration/ansible/
We can now apply the configuration:
ludus range config set -f first-range.yml
Then deploy:
ludus range deploy
And follow logs:
ludus range logs -f
- If needed, you can always delete the current lab with:
ludus range destroy
Using the lab
Now that the lab is deployed, we can access it from the Proxmox host.
For example, by double-clicking on the VM ...-ad-win11-22h2-enterprise-x64-1 which is our domain controller:
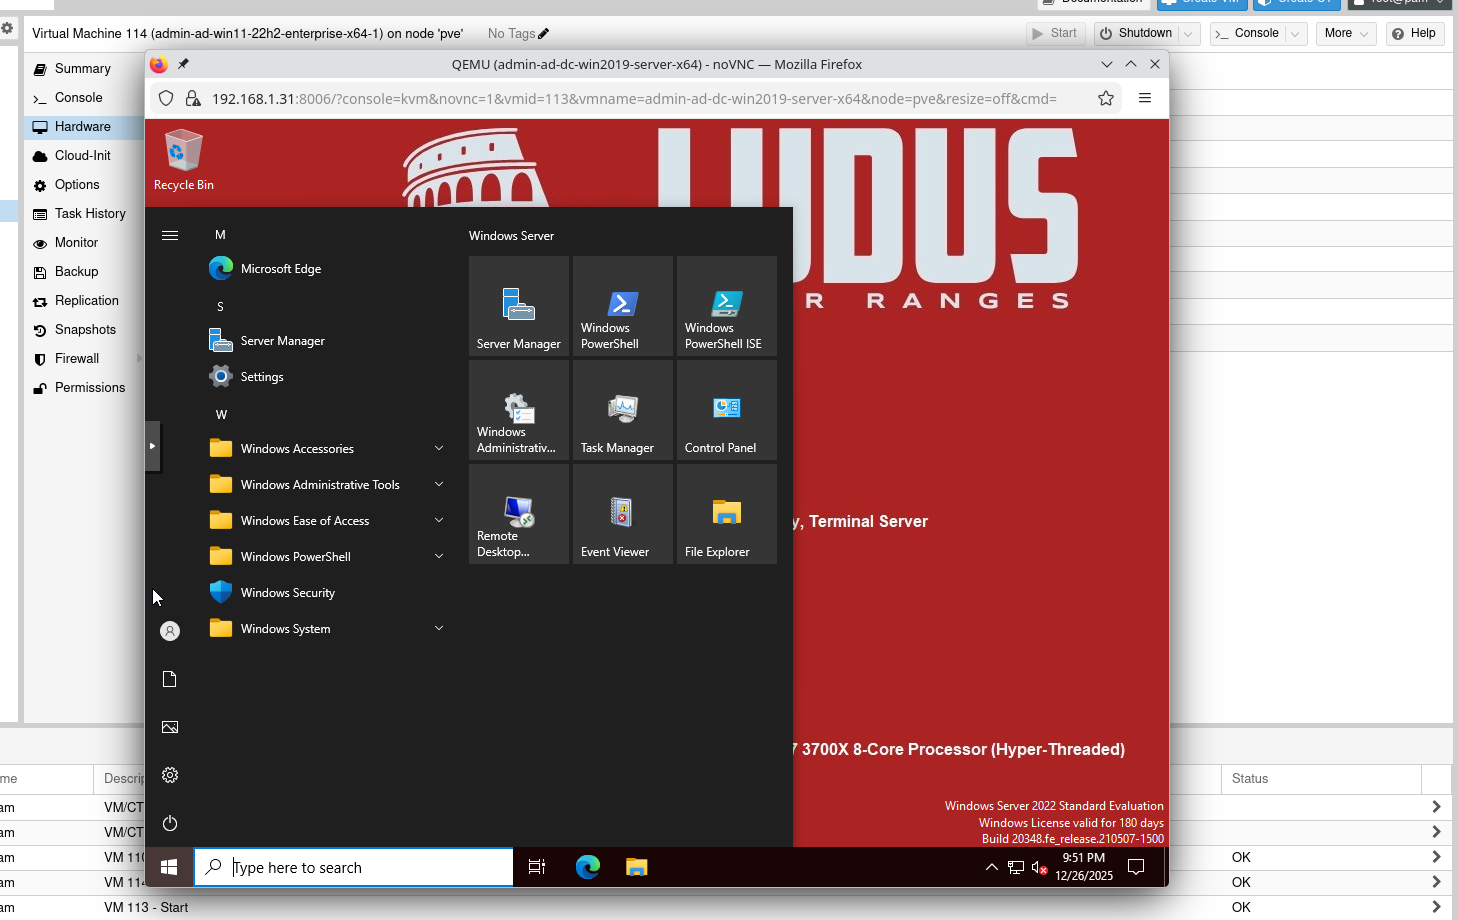
Notice that thanks to Ludus, you are automatically logged into the VM.
Now if we try to connect to the workstation:
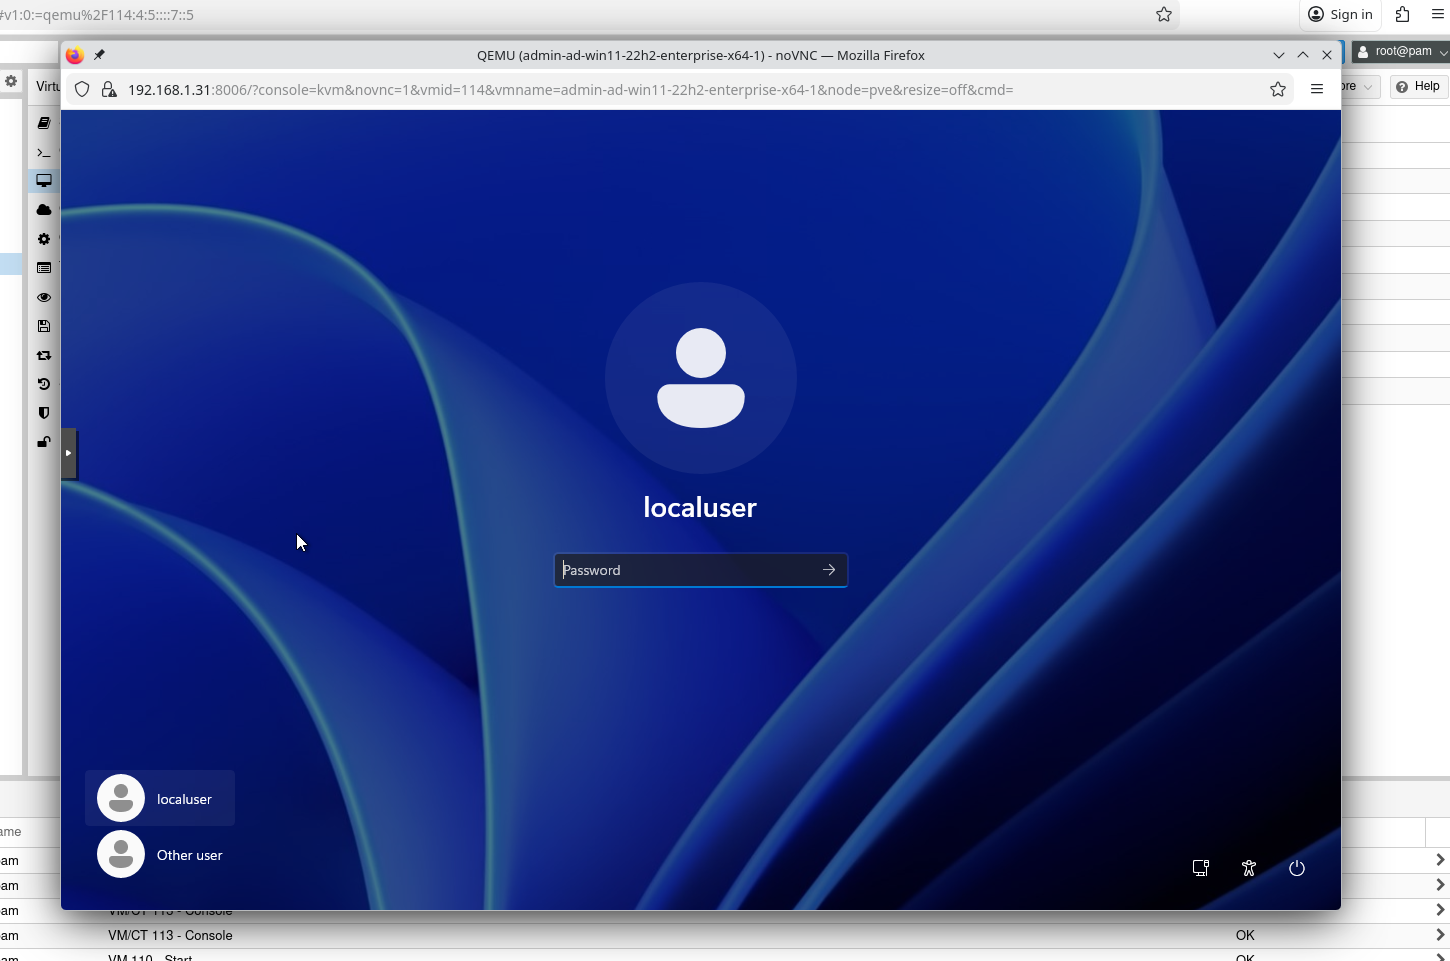
This time, the magic doesn’t work. In the VM parameters we defined:
autologon_user: myuser
autologon_password: mypass
But this user does not exist in the domain. We now need to modify our range to create the user automatically.
Using a predefined role
In the Ludus docs you’ll find all predefined roles: https://docs.ludus.cloud/docs/roles
Here we’ll use this role to add our user at lab startup: https://github.com/Cyblex-Consulting/ludus-ad-content
Start by installing the role:
cd /opt/ludus
mkdir roles
cd roles
git clone https://github.com/Cyblex-Consulting/ludus-ad-content
ludus ansible role add -d ludus-ad-content/

# Alternative (Galaxy-style)
ludus ansible role add badsectorlabs.ludus_ad_content
Now, following the role documentation, modify the AD VM like this:
ludus:
  - vm_name: "{{ range_id }}-ad-dc-win2019-server-x64"
    hostname: "{{ range_id }}-DC01-2019"
    template: win2022-server-x64-template
    vlan: 10
    ip_last_octet: 11
    force_ip: true
    ram_gb: 8
    cpus: 4
    windows:
      sysprep: false
      gpos:
        - disable_defender
        - anon_share_access

    domain:
      fqdn: ludus.network
      role: primary-dc

    roles:
      - ludus-ad-content

    role_vars:
      ludus_ad:
        ous:
          - name: France
            path: DC=ludus,DC=network
            description: French subsidiary
          - name: Germany
            path: DC=ludus,DC=network
            description: Germany subsidiary
        groups:
          - name: Sales France
            scope: global
            path: "OU=France,DC=ludus,DC=network"
            description: France Sales Department
          - name: Sales Germany
            scope: global
            path: "OU=Germany,DC=ludus,DC=network"
            description: Germany Sales Department
          - name: IT
            scope: global
            path: "DC=ludus,DC=network"
            description: IT Department
        users:
          - name: myuser
            firstname: My
            surname: User
            display_name: My User
            password: mypass
            path: "DC=ludus,DC=network"
            description: IT System Administrator
            groups:
              - Domain Users
              - IT
Apply the new config:
ludus range config set -f first-range.yml
To avoid redeploying everything, deploy only this role:
ludus range deploy --only-roles ludus-ad-content
ludus range logs -f
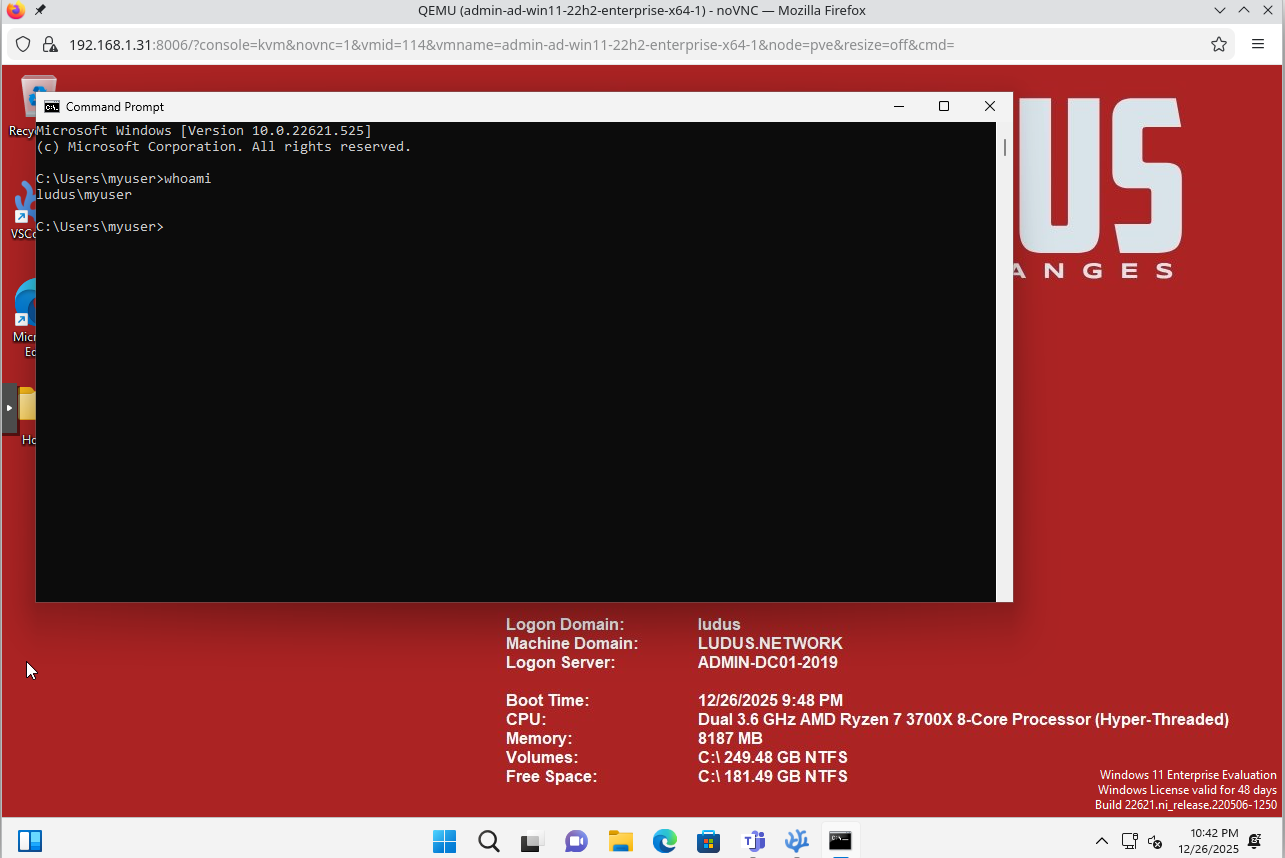
Now you can log in with your new user on the workstation:
Adding templates to Ludus
You may want additional templates. You can find all available templates here: https://gitlab.com/badsectorlabs/ludus/-/tree/main/templates?ref_type=heads
To install a new one (e.g., Ubuntu):
git clone https://gitlab.com/badsectorlabs/ludus
cd ludus/templates
ludus templates add -d ubuntu-22.04-x64-server
Verify:
ludus template list
Then build the new template:
ludus template build
Limitations
One major limitation of Ludus is its routing system. While it’s very simple to get started, it comes with a drawback: you can’t use your own firewall/router to simulate your network.
Network equipment is a prime target for both attackers and defenders because everything flows through it, but we can’t easily customize this part. If you like this article, I’ll show later how to “bend” Ludus with Ansible to solve this.
Closing words
That’s it for this post-hope it’s useful! See you soon for more content 😉